Monday, June 29, 2020

Star Wars Femme Fatale

If you were able to control the Force, would you use it inappropriately? I DEFINITELY would. Jedi Mind Tricks all day long: your kid ("You WANT to clean your room"), Starbucks executives ("You WANT to serve pumpkin spice year round")... the list would go on and on!

When I originally saw the sentiment stamp that I used on today's card, I knew I needed it, but I never had the right image to go with it... until now! Introducing, the Star Wars femme fatale! (And yes, I know the sentiment is grammatically incorrect. It should be, "If I were a Jedi, there's a..." I'm choosing to forgive the stamp company for the wrong word and forgetting a comma.)


The key image is a digital stamp called "Femme Fatale" by KristaSmithStamps (Etsy).

The card is 5" x 7". I colored this gorgeous lady with Copics and fussy cut her. The space background is washi tape (Watercolor Nebula by Altenew), which I adhered to a 6.75" x 4.75" panel. I stamped the sentiment ("Jedi" by Riley and Company), then I popped up both the lady and sentiment with foam dots. Finally, I added some clear Swarovski crystals for a little sparkle.

List of all stamps used on this card:
  • Femme Fatale digital stamp (KristaSmithStamps)
  • JEDI cling stamp (Riley and Company, Funny Bones)
  • Watercolor Nebula washi tape (Altenew)
[JEDI MIND TRICK]: You WILL have a fantastic day!

Saturday, June 27, 2020

Monochromatic Glamour Card

I enjoyed coloring the last card in all gray markers, so I decided to try it again, with a little twist. Since the quote I used mentions lips and eyes, I colored those features in full color.


The main image is a digital stamp called "Makeup Time" by KristaSmithStamps (Etsy).

I kept this card fairly simple, and I tried to channel Audrey Hepburn's glamour. I colored the image with Copics (mainly T and W markers) and then fussy cut her. I layered some patterned and solid papers, and I stamped the sentiment (by Stamping Bella), with a burgundy layer behind that to emphasize it. I popped up the main image and sentiment with foam dots. Finally, I added a strip of rhinestone ribbon and a few clear Swarovski crystals.

List of all stamps used on this card:
  • Makeup Time digital stamp (KristaSmithStamps)
  • Uptown Girl AUDREY Loves Makeup cling stamp set (Stamping Bella)
I hope you have a glamorous day!

Tuesday, June 23, 2020

Two Frankenbatty Halloween Cards

I've made Halloween cards during a few years, but it's definitely not a regular thing for me. Normally, I just don't get into "spooky" images. A few weeks ago, I created this spooky-cute card. Today, I created two more spooky/Halloween cards... and it's JUNE! I'm not sure what's going on with my brain, but I'm enjoying the spooky-cute stuff lately.

I actually created TWO versions of this card, because I love the image so much:


The main image is a digital stamp called "Franken Batty" by KristaSmithStamps (Etsy).

Both cards are slimline (3.5" x 7") card, and the main image fills most of that space. I colored the image with Copics and then fussy cut her. On the "in color" card, the sentiment is from a retired Witt & Sass stamp set ("Sexy Hexy Hilda"), which I cut into two pieces to better fit the card. On the monochromatic card, I used an old wood-mounted stamp ("Happy Halloween 02"). I popped the images and sentiments up with foam dots, layered several patterned papers, and added some Swarovski crystals for bling.

Here's a better look at the "in color" card:


And here's a closer look at the monochromatic card. I was aiming for a "classic monster movie" vibe but may have ended up closer to "mug shot" instead. I suspect this duo was picked up on a Drunk & Disorderly charge, and the bat may still be drunk.


List of all stamps/dies used on these cards:
  • Frankenbatty digital stamp (KristaSmithStamps)
  • Sexy Hexy Hilda stamp set (Witt & Sass Stamps, retired) 
  • Happy Halloween 02 wood-mounted stamp (Stampabilities)
I hope you have a ghoulishly fun day!

Sunday, June 21, 2020

Graduation 2020 Card

My sister just finished her bachelor's degree, and I'm so proud of her! I created this card (as a surprise) to celebrate her accomplishment:


The main image (graduate) is from the "Set of SIX GRADS" digital stamp pack by KristaSmithStamps (Etsy). The entire card measures 5" x 7".

I colored this lovely graduate with Copics and fussy cut her. Next, I stamped the "Garland Bold Prints" cling stamp onto burgundy cardstock with Versamark, then embossed with Gold Tinsel embossing powder. That embossing powder is so sparkly, and it doesn't crack (like the old formula)! I cut the stamped/embossed panel to 4.75" x 6.75".

I cut several 2 and 0 numbers, using the Tonic "Windsor Numerals" die set. I cut 4 of each number: 2 white, 2 black. I wanted the numbers to sparkle like the background, so I tapped the die-cut numbers on the Versamark stamp pad and dipped them in the Gold Tinsel embossing powder. Once I melted the powder with my heat tool, I repeated the process, until I couldn't see any of the white cardstock. I recommend using thick, sturdy cardstock if you want to coat it with embossing power.

TIP: To protect your hands, use a pair of tweezers to hold the die-cut piece while using the heat tool. Also, if you need to add several layers of powder to get a solid finish (like I did), you can dip the die-cut piece back into the dry embossing powder while the powder is still hot. The dry powder will stick to the hot, melted powder on the die cut. This is a LOT faster than waiting for the die cut to cool, tapping it on the Versamark pad again, dipping it, etc.

When I was satisfied with the sparkly, gold numbers, I glued them onto the black numbers, slightly offset to create a "shadow" effect. For the floor, I cut a 1.25" x 4.75" piece of wood-patterned cardstock. (I keep scraps of special papers just for occasions like this!) For some dimension, I popped up the floor and graduate with foam dots and glued the numbers to the background panel. Finally, I added a few clear Swarovski crystals.

This photo may show the dimension of the card a bit better:


List of all stamps/dies used on this card:
  • Set of SIX GRADS digital stamp set (KristaSmithStamps on Etsy)
  • Garland Bold Prints cling stamp (Hero Arts)
  • 'Windsor' Numerals Simple Type die set (Tonic Studios)
I hope your day is full of pomp and circumstance!

Friday, June 19, 2020

New Baby Girl Card

Recently, a colleague welcomed a new, baby granddaughter. I don't know how often grandparents receive congratulatory cards when a baby is born, but I felt like she deserved one.


The main image is a digital stamp called "Baby Girl" by KristaSmithStamps (Etsy).

I kept this card fairly simple. I colored the image with Copics and then fussy cut her. I layered some Disney Winnie the Pooh patterned papers I had (from a book I bought years ago) and added a strip of gold washi tape. TIP: Washi tape loses its stickiness over time, so I always add a strip of double-sided tape underneath. I popped the main image up with foam dots. Finally, I added some Prima flowers and a few Rose Swarovski crystals.

List of all stamps/dies used on this card:
  • Baby Girl digital stamp (KristaSmithStamps)
I hope you have a sweet day!

Thursday, June 11, 2020

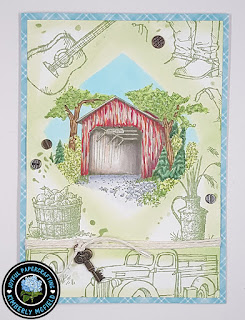
Father's Day Retiform Card

For my dad's 2020 Father's Day card, I decided to do a modified retiform card. I hadn't done (or seen) a retiform card in several years - my last one was in 2017! - but I remembered that they were fairly easy and quick.

A retiform card is just a fancy name for a collage-type of card, using Post-It notes (or something similar) to mask off sections. You typically use two inks, with a monochromatic color scheme: a light shade to blend edges of the post-it note, and a dark shade to stamp the sharp images. My style of the retiform process is a bit of a modification, as I like to select one section of the card and color it in full color, highlighting that section. Here's this year's card:


I used several older, retired stamp sets to create this retiform card. (All of the sets are listed at the bottom of this post, in case you'd like these specific images.)

I took several wide Post-It notes and masked off sections of the card, leaving the largest section in the middle so I could color it. I used a light green ink (Memento New Sprout) and a blender tool along the edges of the Post-It notes and the edges of the card. Once I'd segmented my sections, I stamped the various images with a darker green ink (Memento Bamboo Leaves). I also used a stencil to add very light texture to all segments EXCEPT for the center. The masking process looks like this:


Once I'd stamped all of my selected images, I used Copics to fully color the scene in the center of the card. I matted the panel on a plaid Lawn Fawn paper, then used some twine and metal embellishments to decorate the card. I tried to leave it as rustic and uncluttered as possible.

If you'd like to see the card I made in 2017, here it is:


List of all stamps/dies used on this card (Father's Day 2020):
  • Honey Run Bridge cling stamp (Whimsy Stamps)
  • Country Livin' cling stamp set (Stampin' Up)
  • Always Thankful cling stamp set (Stampin' Up)
  • Splatter Stencil (Altenew)
I hope you have a wonderful, crafty day!

Tuesday, June 9, 2020

March to the Beat of Your Own Drum

Today, I've created a fun, music-themed card. This card would work for almost any occasion: birthday, thinking of you, encouragement, etc.


The main image is a digital stamp called "Music Digital Stamp" by Sweet Escape Digis (Etsy).

The sheet music background paper is glittery, and I bought it several years ago. It's been sitting in the box of specialty cardstock, just waiting for the right image to pair with it. When I saw this happy girl, I knew they belonged together!

I colored her with Copics and fussy cut her. I stamped the sentiment (from Strike up the Band by My Favorite Things) and die cut all of the music notes. Since the background paper has a light glitter on it, the music notes needed some glitter, too. I covered them in Fire Engine Red Microfine Glitter (Sparkle and Sprinkle). I popped up the girl and sentiment for some dimension, and the other music notes are glued directly on the background paper.

TIP: When you're glittering an entire die-cut element, either use cardstock close to your glitter color or use a marker/pencil to color it before adding the glitter. For example, I cut all of my notes out of the same red cardstock that you see on the base layer. If you do that, you don't have to worry as much about whether there are tiny spots where glitter doesn't stick/cover. Everything will blend!

It's a little difficult to see just how sparkly everything is from the photo, so here's a video:


List of all stamps/dies used on this card:
  • Music digital stamp (Sweet Escape Digis)
  • BB Strike up the Band stamp set (My Favorite Things)
  • Treble Clef die (CAS-UAL Fridays)
  • Little Music Notes die set (Lawn Fawn)
I hope you have a rockin' day!

Sunday, June 7, 2020

Coloring Challenge Bonus BONUS Day: Spooky

OK, so I already created my own "bonus" day for the 5-day coloring challenge, but I still felt like creating another project... so here's the Bonus BONUS Day! Today, I chose "spooky" as the theme.


The main image is a digital stamp called "Elphaba" by Krista Smith Stamps.

I don't typically make Halloween cards, but I decided to go with a spooky/Halloween direction with this image. She's just so darned spooky-cute! I created a slimline card (7" x 3.5"). I colored her with Copics and cut her out with my Scan N Cut. I stamped the sentiment from MFT's Fab-BOO-lous Friends stamp set and popped it up with foam dots. I got the skull and spiderweb papers from a Halloween cardstock book I bought last year (but never used). I also used foam dots to pop up the character and her "floor," and I added a few black, glittery, spiky embellishments for a little bling.

It's a little difficult to see all of the dimension on the card, so here's another view:


List of all stamps/dies used on this card:
  • Elphaba digital stamp (Krista Smith Stamps)
  • Fab-BOO-lous Friends stamp set (My Favorite Things)
I hope you have a spooky-cute day!

Saturday, June 6, 2020

Coloring Challenge Bonus Day: Magic

Well, the Krista Smith Stamps' Coloring Challenge was only for five days... but I generated so much momentum, so why stop there?!? I decided to create ONE MORE project and consider it a "bonus" day of the challenge! For the bonus day, I chose "magic" as the theme.


The main image is a digital stamp called "Wizard Fan" by Krista Smith Stamps.

I loved this image and decided to color her in Gryffindor colors. (That should make my sister happy; I'm actually a Ravenclaw!) I'd never colored hair like hers before, and it was definitely a challenge. (OMG, so many beautiful, bouncy curls!) The final card is 6" x 6", and she takes up most of that space.

I made a quick-and-easy background using the Small Brick Wall Stencil (My Favorite Things) and some Red Velvet Gina K Glitz Gel. I fussy cut the character and popped her up on foam dots (to give dimension beyond the heavily-textured background). Finally, I stamped a sentiment from the Unicorns and Glitter stamp set (My Favorite Things) and also popped that up with foam dots.

List of all stamps/dies used on this card:
  • Wizard Fan digital stamp (Krista Smith Stamps)
  • Unicorns and Glitter stamp set (My Favorite Things)
  • Small Brick Wall stencil (My Favorite Things)
I hope you have a magical day!

Friday, June 5, 2020

Coloring Challenge Day 5: Favorite Krista Image

Holy cow, I made it to Day 5 of Krista Smith Stamps' 5-Day Coloring Challenge! That means I made a new, complete project every day for the past five days. I typically spend 2-3 days (or more) on each project, so this week was like a marathon!

Today's theme is "Favorite Krista Image." However, I only discovered this artist a week ago, so it's WAY too soon to pick a favorite! Instead, I picked one I really liked and made a fun card for a friend or colleague:


The main image is a digital stamp called "Wine Time" by Krista Smith Stamps.

Since this image was tall and thin, I created a slimline card (3.5" x 7"). I colored the image with Copics and layered it on some Stampin' Up patterned paper. I added a funny sentiment (by Two-Lips Stamps) and popped up the sentiment with foam dots. Finally, I added some purple and white enamel dots, for a little texture.

List of all stamps/dies used on this card:
  • Wine Time digital stamp (Krista Smith Stamps)
  • Wine Labels stamp (Two-Lips Stamps)
Cheers!

Thursday, June 4, 2020

Coloring Challenge Day 4: Together Theme

It's Day 4 of Krista Smith Stamps' 5-Day Coloring Challenge... just one more day to go! It's been like a marathon to create a new project every day. Today's theme is "Together," and I think this little girl and her unicorn make the perfect pair.


The main image is a digital stamp called "Unicorn Stuffie" by Krista Smith Stamps.

For my 5" x 7" card, I colored this adorable pair with Copics and fussy cut the bottom half of the image. I layered several patterned papers (from Stampin' Up) for the floor and polka dot background layer, and I used a ruler to draw and color some wallpaper stripes behind the girl. I added a stamped sentiment (My Favorite Things), popped up with foam, as well as some glitter and Swarovski crystals for a little bling.

List of all stamps/dies used on this card:
  • Unicorn Stuffie digital stamp (Krista Smith Stamps)
  • Unicorns and Glitter stamp set (My Favorite Things)
I hope you have a happy, relaxing day!

Wednesday, June 3, 2020

Coloring Challenge Day 3: Under the Sea

It's Day 3 of Krista Smith Stamps' 5-Day Coloring Challenge, and this is my project (Under the Sea Theme). I thought I was done with mermaids for a while, but this one managed to convince me otherwise. Isn't she so sweet??


The main image is a digital stamp called "Both Mermaids" by Krista Smith Stamps. (The image actually includes TWO mermaids, and I just selected one of them.)

For my 5" x 7" card, I colored this lovely mermaid with Copics and cut her out using my Scan N Cut. I stamped the sentiment from a Kraftin' Kimmie stamp set, and then I focused on a quick-and-easy background that really makes an impact!

I cut a 4.85" x 6.85" piece of white cardstock and used a blender tool to cover it with Blueprint Sketch Distress Oxide ink. I taped it down and then layered the Current of Fish stencil (by Picket Fence) over the panel. I spread Silver Gina K Glitz Gel with a palette knife over all of the fish, then carefully peeled the stencil off... and look at the result! An easy - and SUPER SPARKLY! - ocean background!


I used foam dots to pop up the mermaid and sentiment on my newly-created background.

List of all stamps/dies used on this card:
  • Both Mermaids digital stamp (Krista Smith Stamps)
  • Ocean Background stamp set (Kraftin' Kimmie)
  • Current of Fish stencil (Picket Fence)
I hope you have a happy, relaxing day!

Tuesday, June 2, 2020

Coloring Challenge Day 2: Thinking of You

It's Day 2 of Krista Smith Stamps' 5-Day Coloring Challenge, and this is my project (Thinking of You Theme). Today's card has a deeper meaning to me. First, the card:


The main image is a digital stamp called "Fall Weather" by Krista Smith Stamps. And now, the deeper meaning:

A week ago, I lost my sweet, little Pippin. I called him "the Dogtator," because even though he weighed only 8 lbs., he commanded the entire household. His personality was so big that he filled every space. He had so many medical issues - IBD, diabetes, infections - that I was lucky to have him for 11.5 years... but I wanted him for 11.5 more. I've cried every day since he passed. I miss everything about him, including his sweet smile.


For my 5" x 7" card, I imagined that the girl is thinking of someone she loves, too. I colored everything with Copics and typed up a sentiment. A few pearls, leaves and gems completed this fairly quick-and-easy card.

List of all stamps/dies used on this card:
  • Fall Weather digital stamp (Krista Smith Stamps)
I hope you have a happy, relaxing day!

Monday, June 1, 2020

Coloring Challenge Day 1: Summer Vibes

I've decided to participate in Krista Smith Stamps' 5-Day Coloring Challenge, and this is my project for Day 1 (Summer Vibes Theme). I decided to keep everything fairly clean and simply today, just featuring the main image and a stamped sentiment:


The main image is a digital stamp called "Snorkeling" by Krista Smith Stamps.

My card measures 5" x 6.5". I colored everything with Copics and added a cute sentiment from the Friends with Fins stamp set (My Favorite Things). I decided to keep the color scheme yellow, blue and green. A few blue glass drops completed this fairly quick-and-easy card.

List of all stamps/dies used on this card:
  • Snorkeling digital stamp (Krista Smith Stamps)
  • Friends with Fins stamp set (My Favorite Things)
I hope you enjoyed this project and have a wonderful day!