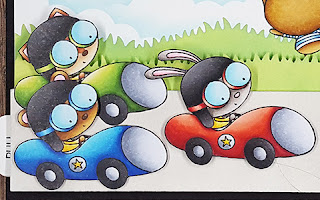
Today, I've created a special birthday card for my four-year-old nephew. I'm also playing along with Simon Says Stamps' Wednesday Challenge (Anything Goes).
My card measures 4" x 8.5", and all of the characters are from the Fast-Track Friends stamp set (My Favorite Things). Since we read from left to right, I wanted the racers to face right, so I used a mirror stamp (Mirror Block by Paper Smooches) to turn them around. When you mirror stamp, you use an acrylic block to stamp the image directly onto the mirror stamp (either mounted on another acrylic block or on your stamp positioner tool), and then you stamp the mirror stamp onto your paper. I did that three times, so I would have three racers.
Once I stamped the racers, I decided that I wanted them to be different animals, not all bunnies. I colored all of the characters with Copic markers. I used creative color placement, as well as stamped ears from other characters in the stamp set. Once I fussy cut them with scissors and glued the new ears on them, I had three distinct racers (bunny, fox and bear)!
I stamped the other characters, masking the middle character (with the sign) so I'd have them together in a group. I colored and fussy cut them. I also stamped, colored and fussy cut the bear and tires for the inside of the card.
To build the scene, I cut a 3.75" x 8.25" white panel and used the Slimline Cloud Edges stencil (MFT) with Tumbled Glass Distress Oxide. I cut other panels from white cardstock, using the Slimline Grassy Hills dies, as well as a 1.75" x 8.25" strip for the race track. I used Mowed Lawn and Twisted Citron Distress Oxides on the grass layers, then Pumice Stone Distress Oxide on the race track, masking off a 1.6" section for the finish line. I used a ruler, pencil, and Copic marker 100 to create the checkered finish line.
Next, I assembled the slider loop mechanism (using the Slimline Starter Die-Namics) and attached the layers together, using SU Foam Strips for the moving layers and Scor-tape for the other layers. This is how the card moves:
My Favorite Things provides an instruction video for the Slimline Starter Die-Namics (with double-loop slider) on their website, and I followed those instructions to create the slider loop on my card. HOWEVER, I had to make one very, very important deviation: the plastic loop itself!
In the video, the artist uses a strip cut from a large (freezer) Ziploc bag. That did not work at ALL for me, as the slimline size is so long that any strip you cut will have a seam, and the seam gets stuck in the holes!! I fought with it for at least 20 minutes before I started searching in my craft room for alternatives, and I finally settled on the Simon Says Stamp Slimline Clear Bags. These are clear, plastic bags that you use to protect/store your slimline cards... and, most importantly, the bottom of the bag is just folded/pressed, NOT a seam! I cut my strip vertically from the bag and substituted it for the Ziploc bag in the video. It worked perfectly and slides smoothly! This is definitely a trick I'll remember for any future slimline slider cards.
I finished the inside of the card with several layers of cardstock and the other images I stamped, colored with Copics and fussy cut. Here's the inside:
- Fast-Track Friends stamp set (My Favorite Things)
- Mirror Block stamp set (Paper Smooches, retired)
- Slimline Starter Die-Namics (My Favorite Things)
- Slimline Grassy Hills Die-Namics (My Favorite Things)
- Slimline Cloud Edges stencil (My Favorite Things)
- Interactive Labels stamp set (My Favorite Things) (to stamp "pull" on the tab)
Other supplies:
- Copic markers (various)
- White, black and red cardstock
- Double-sided tape (Scor-tape)
- Foam Adhesive Strips (Stampin' Up)
- Multi-Medium Matte (Ranger)
- Memento Tuxedo Black Ink
- Slimline Clear Bags (Simon Says Stamp)
- Distress Oxides: Mowed Lawn, Twisted Citron, Tumbled Glass, Pumice Stone
- Cutter-Bees scissors
Happy Crafting!


No comments:
Post a Comment